Pages

November 25, 2010

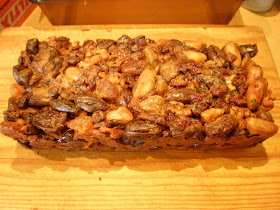
Fruit and Nut Loaf


One of the fun things about my job is developing new recipes.

Well, really, there's no such thing. Unless you work at Noma, El Bulli or Fat Duck or in one of the magical molecular kitchens,that is. When I'm looking for something new, I have a bit of an idea in mind,then start delving deep into my resources - cookbooks, magazines, favorite food blogs and Google. I brainstorm and scribble little notes to myself in notebooks and even sketch out stick figure type drawings of how I want it to look and be plated. I take elements of many recipes and slowly piece them together a bit like Frankenstein's Monster cobbled together from many sources, until it resembles most the idea rattling around in my head.


This month we wanted to revamp the Cheese Platter dessert option. Well, really, there's not much you can do with chunks of cheese on a plate. No matter how delicious they are. We want the integrity of the cheese to remain, so it's all about 'Accessorising'


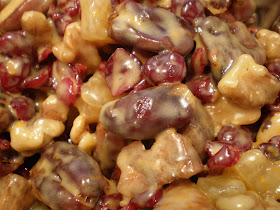
Anyone can do crackers; fresh crispy type fruit is a given; so we decided to go for a fruit and nut loaf. I based the idea on the good old Stained Glass Window Cake. This is made up of different types of glace fruits and nuts held together with a very minimal amount of batter to cement it.


The original recipe of glace fruits would be way to sweet and overpower the delicateness of the cheese, so I chose different types of dried fruits to compliment them instead. There were a couple of types of nuts and just a little orange zest for that special little something extra.


Ingredients:


175g cranberries


175g dates


175g plump style dried figs


175g naked ginger- crystallised but not rolled in sugar


175g of mixed nuts- I used Brazil and walnut, but will change to almond and macadamia


1/3 cup gluten free plain flour


1/4 tsp gluten free baking powder


2 tablespoons castor sugar


2 tsp grated orange rind


40g of melted butter


2 eggs


Roughly chop the figs and dates


Mix the eggs, sugar, rind and butter


Add in the flour and baking powder


Mix in the fruit and nuts


Tip into a lined loaf tin and press down hard to compress


Bake at 150* for 90 minutes


Let the cake cool in the tin and preferably leave overnight before cutting, to avoid it breaking into pieces. When you do cut it, use a sharp serrated knife and saw through carefully as the fruit may be a bit sticky.


Serve this as part of a cheese platter, or enjoy it with a cup of Earl Grey tea.


If you want to make this as an alternative Christmas Cake, just use a selection of glace fruits instead, and maybe a dash of rum or brandy. While the cake is still fresh and ht from the oven, brush it generously with the rum or brandy so it sucks up even more festive cheer!


Now an update on BigJ... the good news is that the surgeon was able to reattach the severed finger and we expect a full recovery with free range of feeling and movement! The bad news is that this, of course, takes time. It will be at least 3 months before things are even remotely back to normal. He will have keep it dressed and splinted for most of that time, and really be careful. He is managing to get back to work and even do a modified style of typing.


This is littlej's solution to the problem.
Isn't she a subtle, sensitive soul?

So Readers, what do you like on a Cheese Platter?

November 17, 2010

Get Some Mork's On Your Fork


I love Thai food.

If I could only have one cuisine to live on for the rest of my life, I think I would choose Thai. It just has it all; warming curries, cool salads, all the taste ticklers-sweet salty sour and hot, rice not nasty gluten based. Really, what's not to love.


I have numerous books on the subject of Thai food, I have done my due diligence in researching the local take on Thai cuisine (with varying degrees of yumminess), I have attended the Thai Embassy and Thai Temple open days and food fairs, etc etc etc

But... If you are interested in something you may as well learn from the master. With this in mind, I have recently been attending some Thai cookery classes at icook culiary college, Mawson, led by Mork, from Morks restaurant in Florey.

Despite my love of Thai cusine, I wouldn't have been tempted to spend this amount of money on 4 classes if the teacher hadn't been Mork. He is a lovely, engaging young guy who really knows his stuff. His family has run their own restaurant for many years before opening Morks, which has a bit more of a contemporary twist and is more up scale than the usual neighbourhood place.


BigJ and I love the food at Morks. I even wrote a post with a review of their fantastic food, but somehow there were no photos to put with it! So when I saw these classes advertised in the Canberra Institute of Technology short courses, I knew I wanted to go.


The classes covered a wide variety of tastes and recipes including many I'd never experienced before. We did pastes and salads, tofu and meat, veggies and desserts- yumm! All ingredients were covered in the price, and we all sat down together for a communal meal at the end of each class and even shared a glass of wine or two!


This is a very simple recipe that was one of my favourites from the classes. It's not complex like the curries, or zingy fresh like the salads, but the smooth silkiness of the eggplant coupled with the chilli was delicious and I thought I'd share it with you.


Grilled Eggplant with a Chilli Paste Dressing

1 Tbsp Chilli paste with soybean oil
- we used the Pantainorasingh brand

3 Tbsp lemon or lime juice

3 Tbsp fish sauce

1 Eggplant sliced lengthways

1 Tablespoon of fried asian shallots

1 Bunch of corriander


Grill the eggplant in a little oil until soft and caramelised.


Combine lemon juice, fish sauce, and chilli paste until well mixed


Arrange eggplant on plate and dress with sauce.


Chop corriander aand sprinkle over dish.


Garnish with the fried shallots and serve.


This has been a hetic week for us here, hence the lateness of this post. BigJ amputated his top finger joint on the weekend, and after several days in hospital, surgery and many medications later, we are back home and everything is looking hopeful, thank God, because it could have been much worse. Lets just say that the next time he uses a power tool, the dog will be tied up securely out of the way. I can say that I have never driven so fast in my life, but thankfully no policemen were inbetween me and the hospital, because I really don't think I would have stopped for anything. littlej also heard many interesting words for the first time, and we can but hope they aren't seared in her memory forever!


So Readers, what would you risk a speeding ticket for?


November 7, 2010

Gluten Free Chocolate Chip Peanut Butter Cookies


This is not really a recipe, it's more like alchemy.


Taking raw ingredients, combining them just so, and having them almost magically convert into something amazing! I'm not to sure how the magic works, every time I make them I'm sure I'm missing an important bit.. but they just work. Every time.

Beautiful Celia, from Fig Jam and Lime Cordial, sent me this recipe. She had posted a yummy 'normal' cookie recipe on her blog, then kindly sent me a gluten free alternative. What a sweetie to think of us InTolerants like that! Here is the link to her original post:
http://figjamandlimecordial.com/2009/03/23/gluten-free-chocolate-chip-cookies/


This has simply got to be the easiest recipe ever. Only a few ingredients that you have in your pantry anyway, only one bowl, not much mixing or stirring, and only 15minutes away from yummy deliciousness. Win win. In fact, these are so easy that littlej is now the designated PBcookie maker as they are almost an insult to cooking. Remember I told you they are not cooking, they're magic.

Here are the ingredients for 2 dozen decent sized cookies:

1 cup of peanut butter
1 cup of packed brown sugar
1 cup of chocolate chips - I use dark chocolate to be lactose free
1 egg
1 tsp of baking powder
1/2 tsp of vanilla essence

Now Celia recommends Sanitarium natural peanut butter, but this week Kraft was on special for only $2, so this is what we used.

Mix everything together, adding the chocolate last. That's it. Nothing else. Told you it was magic didn't I?

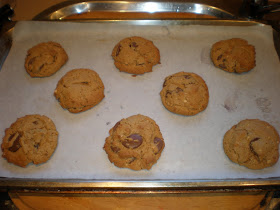
Place a heaped tablespoon of mixture in nice little balls on a baking paper covered cookie sheet. Allow a couple of centimetres between each for spreading.


Put in the oven at 175* for 10-12 minutes and wait for the magic to happen. The cookies will spread out and puff up. They will turn a lovely golden brown, but watch them carefully as they can burn easily. Once you pull these out of the oven they will still be really soft, almost squidgy- but they will harden up nicely when they cool down.


Are you sure these don't have any flour in them, even gfree flour? They look like they do, they taste like they do, no one will believe that they don't. See what I mean by magic?


They also magically disappear.


Now these are great still warm from the oven -after they've set, fantastic for a snack or with a cup of tea, but absolutely amazing for dessert as ice cream sandwiches! We put a big scoop of vanilla icecream between 2 cookies (I think chocolate icecream would be good too) and served them to guests. They had no idea that they were gluten free, or that this was the first time I'd ever made this recipe. They just knew that they were yummy, and kind of magic. The children were magically quiet for about 10 minutes, and smiles magically appeared on the grown ups faces, and everyone was happy. That's a magic moment worth repeating for sure.

Thanks Celia.


So Readers, do you have a magic recipe?