Pages

June 27, 2012

Chilli Corn Bread


We're finally past the Winter Solstice. The shortest day, and longest night of the year.

That should be good news- right?

I guess the good news is that we are inching towards Spring..... slowly
But the bad news is that we still have the coldest days of the year ahead of us.


This calls for even more rib-sticking goodness and gratuitous carbs as we comfort ourselves with comfort food and the knowlege that This Too, Shall Pass. By making a more savoury recipe this week I feel very virtuous indeed, as it has been a real struggle not to surcumb to my cravings for hot, sticky puddings dripping with syrup and doused with lactose free cream.

I sure hope you appreciate it


Any way, I was wanting something yummy to mop up gravy and pan juices of all the slow cooked meals we've been having lately. Not bread exactly, but not going to the effort of dumplings either. I eneded up deciding on Corn Bread.


Fairly light, sweetness from the corn, bite from the chilli, and all pulled together with the mildness of the cheese. I used soy cheese today as it's a lot less assertive in flavour than my favourite goat cheese, and I wanted the bread to be versatile. As you can see it was not photographed with the slow cooked shoulder of lamb, or the sticky baked goat ribs we also had this week for dinners, but with littlej's tin of Baked Beans. Her comfort food of choice as she's home sick this week. It just goes to show how this Cornbread goes well with evrything!

For this version I used 2 types of cornmeal- fine Polenta and Mexican style Masa Flour. You can use gluten free plain flour in place of the Masa, but watch the liquid as you might not need nearly as much.


Chilli Corn Bread


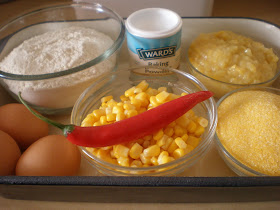
2 cups fine Corn Meal/Masa Corn Flour
1 cup Polenta
2 cups tinned Creamed Corn
1 cup Corn Kernels
1 cup Water or lactose free Milk
3 eggs
1/2 cup grated soy cheese (or other lactose free type)
1 tablespoon Baking Powder
1 tablespoon Oil
1 tablespoon Sugar
1 finely chopped Chilli
Tabasco Sauce to taste
Salt


Thoroughly mix together the dry ingredients


Whisk up the eggs, adding the water, creamed corn and oil


Add both mixtures together, then pop in the kernels, sauce, chilli and cheese. Don't over mix


Isn't it a pretty mix, with all the yellow and red flecks ?


Pour into a greased cake tin, then bake at 200*C for an hour


Let it cool down for a while before slicing and serving with some yummy beans so there's something to soak up into the bready goodness, yummo!


This is a lovely bread with a large, loose crumb. Certainly not meant for sandwiches or suchlike, but perfect as a side dish with your wintery warmer of choice


So Dear Readers, do you like something to soak up the juices or gravy of your favourite Winter Dishes?


.


June 20, 2012

Seafood Chowder


I've been trying to incorporate more seafood into our diet.

I'm meeting a surprising amount of resistance actually. BigJ hates orange coloured fish, littlej and MiddleC both hate prawns and they all hate picking meat around tiny little fishy bones. I'm trying to change their perception of fish and give them courage to tackle the unknown at the same time.

A curry was on my radar, we all love Asian style curries, and familiarity is always comforting, but then with minus 5*C outside, I got to craving a lovely, thick, rib sticking bowl of soup to cuddle my hands around. My family will love it! Well, with nothing else on offer it's love it or go hungry- those are my rules :)


I was going to buy a selection of seafood, but then I spied this marinara mix- what a bargain at just $5kg! Obviously needing to be used quickly, but with a great mix of white fish, mussels, prawns, salmon, ocean trout and calamari I wasn't going to pass it up.


750gm Seafood Marinara Mix
3 Corn Cobs
1 big or 2 small Carrots
3 nice Eshallots or 1 large Onion
4 medium Potatoes
Veggie or Fish Stock (about 1.5lt, but varies)
2 cloves of Garlic
3 tablespoons Gluten free Flour
Flat leaf Parsley
Lemon Zest and juice to taste
Salt and Pepper


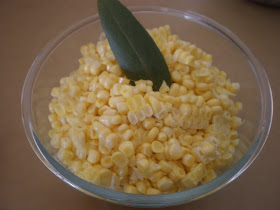
Strip the kernels from the corn cobs, slicing down the length into lovely milky slabs


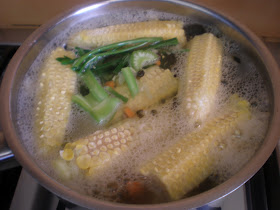
Don't waste the empties, I popped them and the other veggie off-cuts into a pot of water to make the stock for my soup while I prep the rest of the ingredients


Chop the veggies into nice dice. You certainly don't need to make them this small, I just thought they looked pretty. Use a food processor if you like
I also chopped the seafood smaller to make it incorporate into the soup better, and make it less 'obvious' visually


Pop the shallots, celery and carrot and garlic into a pan with a couple of tablespoons of oil, and sweat them down gently without colouring until slightly softened


Add in the flour and stir to coat and to cook out the 'rawness' in the flour.
Careful it doesn't stick or burn!


Pour in the stock, add the potatoes and bay leaf and season


Leave to simmer gently until the potatoes are just tender. Stir from time to time just to make sure it doesn't catch on the bottom


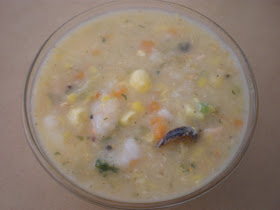
A good chowder is nice and thick, a lot contain cream or milk, but I want to keep mine dairy free  so I think I can get a great creamy texture by quickly pulsing the finished soup instead. I certainly don't want to puree it, just a quick buzz or two with my stick blender to smash out some of the starch from the potatoes and corn.

See, Before and After:


Now it's time to add in the seafood.
Turn the heat right down low. Stir around gently, the heat of the soup will start to cook it straight away and you certainly don't want to over cook it into little fishy bullets- yuck!


This is the time to check for final seasoning and even add in a little lactose or dairy free cream if you like. I also added a quick scrape of lemon zest and a bit more finely chopped parsley to freshen it up before plating


Now the Final Product!

Lovely thick and creamy, mellow with the mix of seafood with a little zing from the lemon. Yummo! Just what was needed for such a freezing cold evening.


So Dear Readers, do you like soup on a miserable cold night, and does your family eat much seafood?


June 13, 2012

Gingered Asian Pearl Caramel


Yummy!


I subscribe to 'just a few' cooking related magazines


My justification is that they keep me up-to-date with industry trends and knowledge, seasonal ingredients, give me inspiration and, best of all, they're tax deductible! Obviously I am actually spending wisely and investing in my future- right?

To keep me sane and to avoid being taken over by mounds of paper,  I have a very careful system of magazine perusal that ensures I get the most from each offering.

1. Pull magazine from letter-box giggling gleefully
2. Rip off plastic coating and stare at the pretty picture on the cover
3. Put magazine face-down while I prepare cup of tea
4. Curl up in chair and read magazine from cover to cover. No skipping. I read what the editor has to say, who the contributors are, letters to the advice column, advertisements- the whole lot
5. Sigh with contentment, after another fix of gorgeous styling and innovative cooking
6. Periodically flick through magazine for next couple of days, deciding what I really want to cook and what styling tips I love
7. Rip these pages out carefully, stapling together if necessary
8. File in relevant folder/book
9. Pass slightly thinned magazine onto various friends and if they complain of missing pages promise to ask them for dinner to cook that recipe
10. Cook those lovely recipes, and hopefully blog about them thus sharing the love even more


This month, I was collating the saved recipe collection, when I realised that two of them were very, very similar. I hadn't even noticed until then, but they had both absolutely delicious to me, Coconut and Ginger Baked Tapioca Custard from Donna Hay Magazine, and Coconut Custard with Crushed Raspberry Sauce from Australian Good Food. Both recipes were an egg based baked custard containing coconut cream and lovely little pearl tapioca- sounds delicious! I liked elements from both recipes and decided in the end to go for a mash-up of the two while still adding in my own little touch here and there.

I hope you like my hybrid recipe, hopefully the best bits from all, while leaving out any undesirables and calories


1 cup Tapioca Pearls (both)
135g grated Palm Sugar (DH, GF 1/2 Castor)
1/4 cup Water (DH)
4 Eggs (DH, GF used 3)
1 can + 1/2 cup or 525ml Coconut Cream (DH 400ml+3/4cup cream, GF 500ml)
1/4 cup finely chopped Ginger in Syrup (me) (DH 1 tab ground ginger, GF vanilla and nutmeg)
5 Cardamon Pods, bruised (me)
Pinch of Salt (me)

Syrup (DH)
135g grated Palm Sugar
1/2 cup Water
(GF used coconut crisps and raspberry sauce)


Soak the sago pearls for 20 minutes in a bowl of cold water (GF) then drain
before:


after:


Place the palm sugar and water in a pan, stir over heat until dissolved (DH)


Cook the pearls in pan of boiling water for 15 (DH) to 20 (GF) minutes until translucent, then drain and rinse with cold water


Place the  sugar syrup, eggs, coconut, ginger, cardamon and salt in a bowl and whisk to combine (DH)
(GF heated the coconut cream first, then poured it into the eggs etc.)


Add the tapioca and mix well, making sure it doesn't clump together


Pour into a 1.5lt (DH) or 1lt (GF) oven proof dish, then place this into a larger dish to act as a water bath to cook the custard nice and evenly and gently (both)

Pop the larger dish into the oven then pour in enough boiling water to come halfway up the sides of the inner dish


Bake for 50-60 mins at 150*C until just set (DH), 45-50mins 160*C until surface is firm to with a slight wobble (GF), or 150* for 70 mins or until you suspect the oven temp is screwy then up it to 170* for another 20 mins and custard has a lovely coloured skin on top, seems set on the sides with a bit of a wobble in the centre (me)


Syrup (DH)

Pop sugar and water in pan and dissolved. Bring to the boil and cook for a few minutes until thickened. Cool
Drizzle over custard to serve


Individual Tapioca Ginger Cremes (me)


Grease individual serve ramekins
Pour in a couple of tablespoons of syrup mixture to thickly coat the bottom of the dish


Gently pour in custard mix to fill then bake in water bath for 20 mins until a firm wobble when shaken


Cool in fridge
Place serving plate over top of ramekin


bravely flip over, shake gently, lift ramekin off and allow syrup to drip out over lovely little pudding the way you would with a creme caramel


Serve with extra syrup and thick coconut cream on the side if so desired


Well my Dear Readers, what do you think of the mash-up? I did follow the Donna Hay recipe more than the Australian Good Food one, but they were both so similar, and actually very like a classic Creme Caramel recipe as well.

My husband isn't much of a fan of sago but he does love a good creme caramel, so I told him I had created a Gingered Asian Pearl Caramel and he loved it! Isn't it funny how a name can alter our perceptions of a dish so easily?


So Dear Readers, which recipe would you follow, and do you subscribe to any foodie magazines?


.

June 6, 2012

Stuffed Eggplant Yum Cha


I know I've mentioned how much we love Yummy Cha

As well as enjoying it out and about, I've been slowly building up my own set of gluten and dairy free dishes for when we can't be bothered going out.

Sometimes you just get a hankering for that one dish, and it's nice to be able to whip it up or pull it out of the freezer ready to go when you are.


This is another one of my favourite Yum Cha dishes, Stuffed Eggplant, it's also pretty much the same as Stuffed Tofu, so I count them as the one dish really. The eggplant is so silky, stuffed with a soft delicious filling and then covered with a thin crispy shell of crunch to finish off the sublime taste and texture sensation, and the tofu is the same, just a bit bouncier when bitten into which is just as nice as well.


I'm not going to actually give 'real' measurements for the recipe today though Dear Readers, as it really depends on the size of your eggplant/tofu that is the carrier for this dish.


My filling ingredients for today were some nice pork rashers, shiitake mushrooms and spring onions


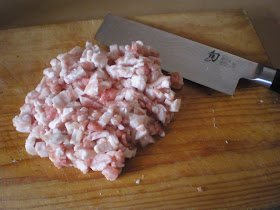
I started by finely chopping some nice pork rashers. I wanted some fat to keep the filling moist and I didn't want it cut too fine as I also wanted some nice texture to chew on as a contrast to the silkiness of the eggplant flesh


I also finely chopped my spring onions and the shiitake mushrooms-  Home Grown!


Then to the flavouring ingredients: ginger,white pepper,garlic and chili paste. You need more of this than you might think as really the tofu and eggplant are quite bland on their own and need a fair bit of ooomphing up. I used a good heaped tablespoon of each, and could have added just a touch more


Mix together thoroughly. I find that using my hands really is best for this kind of thing, and it's fun to mush it all up as well

If you want to check the seasoning, you can take a small amount and quickly cook it off - steam, fry, microwave, whatever- then adjust accordingly


Drain and pat dry the tofu


Cut in half- hopefully a bit neater than this though


Cut the eggplant into lovely half moons a bit over a centimetre thick, the slice a pocket through the centre of each without cutting all the way through the back


Pack the stuffing in nice and firmly or it will be too lose and fall out once cooked


Turn the tofu into a cute little sandwich by carefully loading it up with a decent amount of packed pork filling as well


Place the eggplant and the tofu into a lightly greased steamer basket, and steam for about 10/12 minutes or until the filling is cooked and the tofu is bouncy firm


Let it cool down, then cut the tofu into nice cubes- I cut mine into 6 pieces


Put the egg white into a shallow dish, and break up lightly with a fork.


Dip the pieces of tofu and eggplant into the flour, then the egg whites, then back into the flour again- making sure to shake off any excess at each dunking.

You could just mix the two together to make a slurry type of batter if you want instead, but I like the way this coating is firmer when it's cooked


Heat your oil and fry off the pieces until they are nice and crispy and starting to brown


Drain quickly on a rack while you do the rest, this will stop them going soggy


Cross section of both the eggplant on top, and the tofu underneath. Nice and cooked through inside but nice and crispy outside, yummo


I served my Yummy Cha dish with a nice dollop of chilli bean sauce, but you could have them plain, with soy sauce, black bean and garlic sauce, or whatever takes your fancy.

These will definitely go into my Dim Sum repertoire for the future and are a sure favourite already!


So Dear Readers, have you tried this dish before, and would you chose the tofu or eggplant version?


Now, as promised I have a Second Blogaversary Give Away!

This time the prize is a Junior Master Chef Burger Kit


to enter, just leave a comment on this post telling me if you'd like to win. I will draw the winner by my patented Cat-Raffle Method as usual, and announce the lucky person next post. Good Luck!


.