September 6, 2011
Pao De Queijo
What's Pao De Queijo you ask?
Well, it's a recipe I've meaning to make for a while now, and was finally spurred into action by the latest 'Feast' magazine.
Feast magazine is one of the latest foodie/cooking magazines, released by SBS, and with the by-line 'Experiencing life through food'. They have only been going for 2 months, but I like them so far and am enjoying the international focus you would expect from multicultural SBS.
But I still haven't explained Pao De Queijo, have I?
Well it's a Brazilian cheese bread recipe that's naturally gluten free! And yummy as well, win-win. They're little baked buns that are usually eaten for breakfast or as snack food during the day. They're sold at street vendors, bakeries are even sold as pre-packaged mixes like cake mixes from supermarkets.
The bread is based on Tapioca flour. Now, you know I like to keep my recipe mostly accessible with mainstream supermarket ingredients, so don't worry, you can find Tapioca flour at most Woolies and Coles in the Asian food section for just a couple of dollars, or at any Asian grocery store.
The other main ingredient is cheese, but as we can't get original Brazilian, it can be successfully substituted with aged Parmesan, which is extremely low in lactose, so perfect for me too.
The recipe I used from Feast Magazine is under the heading- My Neighbours Kitchen, and is by Clara Luboss who was lucky enough to have had these made for her by her grandmother, and has had the recipe passed on to her through her mother, so you just know it must be good and has stood the test of time and hungry families! These are always the best ones, finely tuned to be whipped up in a hurry and served to your harshest critics indeed. She states that this is a twist on the traditional recipe, which is usually a much firmer dough and is rolled into balls before being baked. I don't know about you, but a recipe that is prepared in just one bowl, and is ready in 20 mins, sounds like a twist that works for me!
Pao De Queijo
450 g Tapioca Flour
250 ml lactose free milk
250 ml vegetable oil
120 g grated aged Parmesan Cheese
3 eggs
1 tsp salt
Mix all ingredients until smooth. It's recommended to use a blender, but just make sure it's lovely and smooth.
Tapioca is a very, very fine starch even more so that cornflour, so be careful not to turn the machine on in a hurry and have it waft all over the kitchen dusting all surfaces liberally! Not that that's ever happened to me, of course :)
Spray two standard muffin/cupcake pans with oil, and fill them 3/4 full with the batter. I made a half quantity of the batter, and found it filled one cupcake tray perfectly. The author recommends the full recipe will fill 15 holes, so she must be a bit more generous than I.
Bake for 20 minutes, in a 180*c oven, or until golden and puffy, and cooked through.
Serve warm.
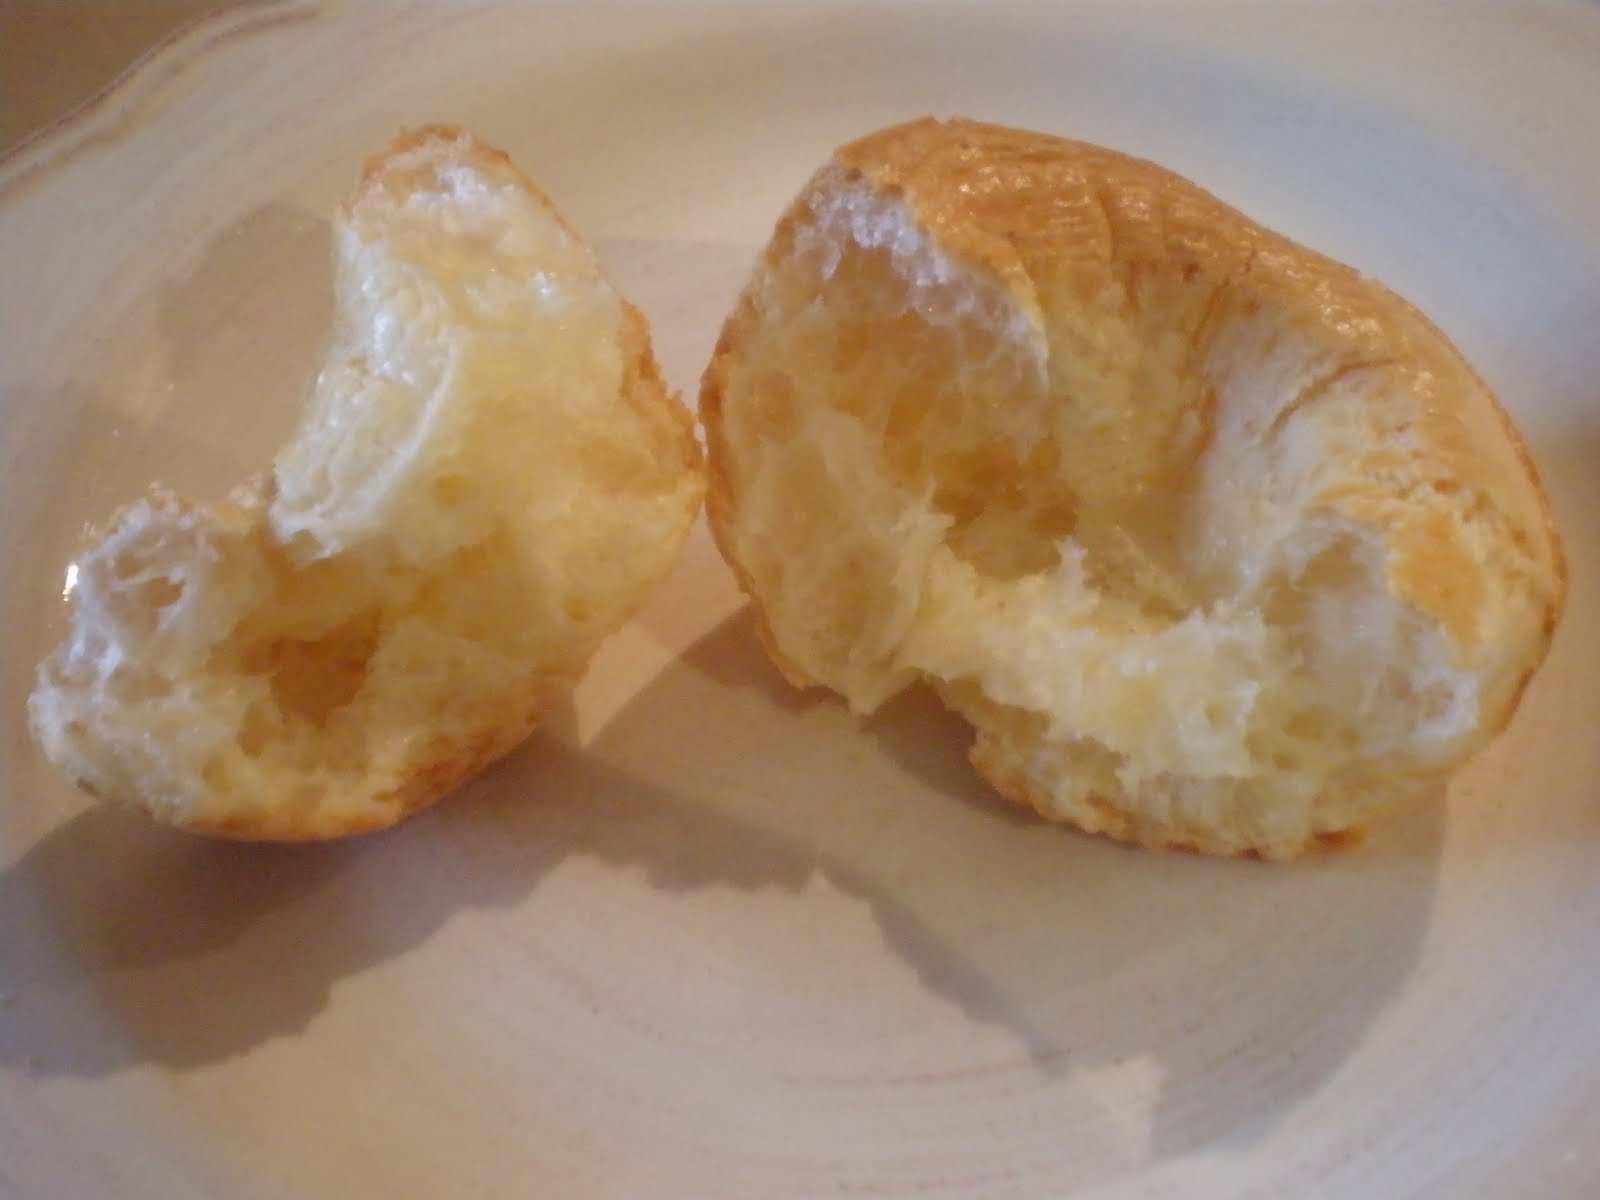
Now these were lovely! They practically jumped out of the pan when cooking, and had developed some interesting designs as they puffed up.
The inside was a loose web of stretchy holes that reminded me of a lovely fresh yeasty bread, and the cheese gave it a nice flavour and added some chewiness to the crust as well.
I certainly don't think it would be traditional, but next time I make these, I'd love to add some garlic in the mix as well, and even some fresh finely chopped parsley or chives too. The lightness and puffiness of these little buns is glorious, and would be a nice change from savory scones for an afternoon tea.
Clara Luboss claimed that she was a lucky child, and I certainly think she was. With a wealth of her grandmothers recipes like this behind her, and the opportunity to share them with the rest of us through Feast Magazine, I think we are too.
So my Dear Readers, have you a favourite recipe passed down from your Grandmother?
September 1, 2011
Apple and Almond Cakes
Happy Spring Dear Readers!
I love the warmer weather, opening all the windows to flush any wintery funk from the house and letting in the sweet scent of blossoms wafting on the breeze!
Where I live we have blossom trees everywhere, pink and white puffs that look delicate enough to blow away with a breath. Blossoms make me think of apple trees, apple trees make me think of apples, and apples make me think of... Apple Cakes of course!
This is a nice dense cake with the addition of almond meal, that's hearty enough to be served as a pudding, but not stick-to-the-ribs enough not to enjoy as a snack. Juuuuuust right.
Apple and Almond Cakes
2 nice large Apples- I used Sundowner today
(1 of them sliced finely, one of them grated)
125 gr Butter
1 cup Brown Sugar
2 Eggs
1 1/2 cup Almond Meal
1 cup SR Gfree Flour
1/3 cup Raisons
1/4 cup Marsala (or other liquid like apple juice)
Spices to taste- I used about a teaspoon of mixed nutmeg, cinnamon and cloves
2 Tab Butter extra
2 Tab Castor Sugar
Soak the raisons in the marsala, I pop them in the microwave for a minute to plump up nicely.
Use a mandoline to slice one of the apples very thinly, or use a really sharp knife and be really careful.
Pop them in a bowl with the extra butter and castor sugar, and microwave them for about a minute and a half to soften down a bit so they're soft enough to mold around the cake tins.
Grease the cake tins, I used texas muffin pans and plain canola spray oil. Mold the apples carefully around the pans, or if you can't be bothered, just place a slice in the bottom of each cavity.
Cream the butter and sugar together until light and fluffy. I like to add the spices now too.
Add in the eggs, one at a time, and beat really well.
Add in the raisons and grated apple and mix throughly.
Fold through the flour and almond meal until well combined.
Put half a cup of the mixture into each muffin cavity, and fold over the edges of the apple slices. Smooth the tops of each little cake well.
Pop in the oven at 180*c for 25-30 minutes, or until a lightly pressed finger on the top of each meets a slight resistance and it springs back gently.
Cool in the pan for 5 minutes, then turn out onto a rack.
You can eat these little lovelies still warm, preferably with some lactose free cream and custard.
They came out sweet and subtley spiced, but I do think the flavour was much nicer the next day, even heated up again. There was just a depth of apple and marsala that wasn't as obvious before. In fact, the only thing I didn't like about these was the way the raisons looked poking through the apple slices. It kinda looked funky, like a spot of mould, or a dead fly maybe... a liberal dusting of icing sugar, the chefs friend, will hide that nicely though, or else make sure that's where you pour the custard!
I must admit, if I make these again just for us, I'll probably just go with the slice of apple on top- and I won't probably pre-cook it either. If I'm making these for the cafe or a dinner party I'd probably go with the all-over look. They both look pretty cute.
The family however, was divided on the subject, we had two votes for the apple-all-over, and 2 for the apple-on-top look. In the interest of fair play we obviously need a tie breaker- so Dear Reader, we look to you.
Which look do you prefer for your Apple Almond Cake?
August 27, 2011
My Darling Madeleine
It was one of those days...
I have been wanting to whip up some little Madeleines for ages. They're such sweet little cakes, perfect for tea drinking and dunking, and perfect for MiddleC who's a total French Freak too.
There seems to be a lot of controversy on what makes up a traditional madeleine, as I found out upon consulting my good friend Google. Brown butter, orange blossom water, almond meal, baking powder, resting, chilling, the 'hump' or not.... the true nature of these little delights was hard to find. Heston had a nice sounding recipe that he said he wooed his wife with, but as that 20yr marriage collapsed recently, that was certainly no recommendation either.
Giving my research up as a bad job, I decided to make my own little dainties in the spirit of culinary law, if not the letter. I decided to flavour mine with Tea and Honey instead. Instead of my beloved Dilmah Earl Grey, I decided to try Madame Flavour's Grey De Luxe instead. Billed as 'classic with a touch of lemon myrtle and lavender' it was certainly worth a cup or two, and sounded like a lovely addition to my batter.
Attempt Number One:
I happily reviewed my collection of recipes, and cobbled together a creation of my own that seemed to have all the same ratios to fit the bill, but with my gluten free and flavour profiles filled. I browned my butter, made my batter, the eggs were slightly flat, but pressed on. I decided not to rest the batter, as the only reason I could find for doing so was to relax the gluten- and that wasn't a problem for me now was it? I filled my pans, the batter was a little thin looking, but we'll see... and baked away.
This was the result:
Ok, these things happen, and I was trialling a new recipe, so I added more flour next time, and reduced the baking time by a fair bit and waited
Nooooo!!!!!!!!!
Third time lucky, right? I played around this time with the ratios. Less butter, more eggs, sugar and flour. All went well until-
My eggs just wouldn't whip enough. The beaters and bowl were perfectly clean, the eggs were room temperature- i leave them out overnight, the weather was perfect- no humidity to speak of.... but no fluffing, no ribbons... Arrrgh... I wasn't wasting any more ingredients on the little buggers, even though I buy them in bulk, this was becoming an expensive process. I beat the eggs for as long as possible without exploding my Kenwood, then continued.
I made quite a few changes to the method this time.
I added a bit of baking powder, just to help out those stubborn eggs,the butter mixture was cooled in the fridge, then thinned out by mixing in some of the eggmix before folding through, and the batter was rested at room temperature for an hour.
OK, I whacked the pans in the oven in a kind of calm despair. If these didn't work, at least I had an interesting story to blog, and waited.
I set my alarm and went into the other room. I wasn't going to sit by the oven door and let the batter know how anxious I was. Confidence is one of the most important ingredients in baking, and I wasn't going to let this one rattle me!
Riiiiiiiiiiiiinggggggggggg........ I raced-I mean walked sedately to the kitchen and opened the door... Yes! There they were, golden beauties with a perfect rise and springing back when lightly pushed in the middle. I pulled them out, let them rest for a couple of minutes, then turned them onto the cooling rack. Risking a burnt tongue I couldn't resist ripping one apart to taste and to check for texture. Oh, I was happy. At last.
75 gm Butter
200 gr GF Flour
6 small Eggs (but I'm sure you could use 4 if they fluff properly)
1 cup Castor Sugar
4 Tab. Honey
3 Teabags
Place the butter in a pan and cook it gently until it changes colour to light brown- but be careful not to burn it. Add in the tea part of the teabags, and the honey, and let it infuse for 20 mins or so as it cools down. Strain it through a fine strainer to remove the solids. Pop it in the fridge to get cold, but don't let it go solid.
Beat the eggs and sugar together until they're nice and thick and fluffy. They should pretty much triple their volume, and leave a thick ribbon if you drizzle some of the mix over the batter.
Take a good spoonful of the egg mix and stir it through the buttery mixture to lighten and thin it out. You want to be able to stir it through the batter evenly and gently, not have to beat it through roughly and ruin all the tiny bubbles.
Sift the flour and baking powder over the eggmix, and together with the butter mix, fold through gently until it's nicely combined. Make sure the butter mix doesn't sink to the bottom of the bowl and hide.
Leave the batter to stand for at least an hour.
Put good teaspoons of batter into greased Madeleine pans, and pop them into a 180* oven for about 7 minutes. Now the time may vary slightly- every oven is a bit different, but the cakes should be puffed and golden, and if you poke them gently they should be slightly resilient.
Pull them out. Let them rest a minute or two, then put them on a cooling rack to cool a little.
Madeleines should be served fresh and still a little warm from the oven, a bit like doughnuts. They still taste good colder and older, but it's not the same as brand new and wafting warm breath straight from the oven to you.
Sprinkle them lightly with icing sugar and enjoy with a well earned cup of tea. Of course you will use the tea you created them with, and if it's not as sublime as Dilmah, it's a pretty close second. Dunk the dainties in, and relax.... breathe in the scents of honey, bergamont, and other tea tasting goodness, and nibble and sip until sated.
Who needs yoga when you have a good cup of tea? What do you think Dear Readers?
August 21, 2011
Pistachio and Rose Syrup Cake
I love floral flavours-
lavender, rose, orange blossom, and I even have jasmine essence and magnolia flavouring as well. As one who'd banned from perfumes and artificial scents due to my various InTolerances, I think I appreciate them all the more.
We can only use unscented or pure eucalyptus or orange oil based cleaners in my house, and even being too close to someone overscented can set me off.
One time MiddleC was house sitting for a few months, then moved back in. The first day was terrible! I was cranky, unreasonable and felt plain angry with her. I was able to realise that it really was weird, and I wasn't resentful of her for being home, but it wasn't until that night when I started itching that I realised it was something environmental not plain mental that ailed me! Poor girl had to wash all her clothes and bedding and throw out all her forbidden smellies like soap, wash powders and the rest before I could get as close to her as normal.
Anyway, after such a success with my Lime and Coconut cake a couple of weeks ago, I thought I'd continue in the spirit of things and try another super moist rich syrup cake, but this time using one of my favourite flavourings, Rose. What goes with rose, well pistachio of course, and thanks to my new Thermo, I can make my own fantastic pistachio meal whenever I want. Of course you can just use almond meal, or a mixture of both if you like and if your food processor is up to the challenge, or just buy some of the pretty little nuts to scatter over the top for serving, I won't mind.
I'm also using a (rather violently coloured) rose syrup I bought at my local Indian Supermarket. There is a really nice Alchemy rose syrup available at some places, or just make a syrup of equal quantities castor sugar and water boiled together and reduced slightly, before adding a tablespoon- or to taste- of rosewater or rose essence.
Pistachio and Rose Syrup Cake
250g Almond meal
200g Pistachio meal
1/2 cup GF Flour
250g Butter
1 cup Sugar
4 Eggs
3/4 cup lactose free Yoghurt
2 tsp gf Baking powder
Rosehip Jam, if desired
200ml Rose Syrup
Cream butter and sugar together until really nice and fluffy.
Add in eggs once at a time until well combined.
Mix together the nut meals, flour,and baking powder and then mix into the egg mix together with the yoghurt. Isn't it a pretty colour?
Put half the mixture into a lined baking tin, then dot with the jam.
Cover with the rest of the mixture, and smooth over the top.
Bake for 2 hours at 150*c. I had a tray underneath my springform tin, and I found that a couple of tablespoons of oil leached out of my cake during cooking. I would put this down to the fresh nut meal, as I've never had this problem before.
While fresh out the oven, pour the syrup over, cover and let cool in tin. If you look closely dear Readers, you might notice the little holes I stabbed in my cake to help it soak up the syrup. I wish I hadn't done that in the end as it didn't look pretty and I don't think it was necessary in the first place, so learn from my mistakes and keep your cake pretty.
I sprinkled my cake with icing sugar to hide it's little blemishes, and decorated it with whole dried rosebuds, aren't they cute? I also served it with some more yoghurt rather that cream as the slight tart note was the perfect match to the sweet syrup.
The pistachio meal made a really nice change from just straight almond, but I think it would taste nearly as nice without it, funnily enough the jam too. Rosehip jam isn't strongly flavoured so if I add it again I'll mix some rose water/essence through it to oomph it up a bit.
I feel quite exotic with my Pistachio Rose Syrup Cake sitting on my counter, and I think it looks just as nice as a bunch of real roses too!
So Dear Readers, would you rather flowers or cake on Your kitchen counter?
August 12, 2011
Rhubarb Lemon Meringue Smash Pie
I love making jam and preserves,
but its such a pain to stand at the stove stirring, stirring, stirring for ages- and then if you forget for a minute and burn the pot it takes aaaages to soak and scrub clean, and cleaning the stove top of splatters too, it can be such a pain!
Consequently I only tend to make jams and preserves when I have such a glut of produce that the freezer can't contain it all.
But all that is about to change!
Last week my wonderful Mum sent me a new toy, a Thermochef which is an almost magical kitchen tool that can do practically everything- perfect for me with an arm out of commission for the next few months! One of the many great applications is that it will make jam all by itself, no supervision required. Awesome. And small amounts of jam as well, even a cup or so, so if I fancy something new to try on my gfree toast every morning I can. Wow. Oh the possibilities....
Anyway, as much as I'm carried away with my jam making, I realise that most of my Dear Readers prefer recipes for a whole dish- so I combined the two to keep everyone happy!
So here's a Rhubarb Lemon Meringue Smash Pie.
Sounds interesting, hmm? Well, I'm not a huge pastry lover, but do like shortbread and it gives a lovely textural crunch to the sublime silky smoothness of the lemon butter and meringue. The Rhubarb is to add that earthy base note to ground the dish and add the tartness to keep your palate from going into a sugar coma after a bowl of this.
I tried a few plating ideas, and liked the long plate style the best. The idea is to look as if you've picked up a slice of Rhubarb and Lemon meringue pie and sort of dashed it across the plate. I imagined the pastry hitting first, then the rest of the filling kind of falling out splashing out by weight, maybe I should have practised by throwing one across the kitchen first?
There is actually a lot of components to this dish, but never fear, I will give a secret hint.... you can buy most of it at the supermarket and then pretend you made it all yourself.
Nice buttery lemon curd is available in jars, there's a gorgeous rhubarb berry jam at Coles, and you can get a packet of quality gfree shortbread to break into crumbs too. See, how easy is that?
Now you can relax with the pressure off, and you can indulge me as I play around with my new toy :)
Rhubarb Jam/Sauce
Two parts rhubarb by weight
one part sugar by weight
couple of tablespoons of water
couple of tablespoons of lemon juice
Tablespoon/ to taste/ balsamic vinegar- I used a raspberry balsamic
However you make this,
you just cook it all down until it's thick and bubbly and sets when a bit is smeared on a cold saucer.
The balsamic vinegar is lovely in this- trust me, and using a raspberry one was even better.
Lemon Butter
80g lemon juice
80g egg yolks- (4)
40g sugar
80g butter
Cook this in a double boiler whisking constantly until lovely and thickened and will coat the back of a spoon.
Rhubarb Batons
Cut the rhubarb to the size you want, sprinkle thickly with sugar, sprinkle liberally with water, then bake in a moderate oven for 10-15 minutes. The rhubarb should be soft enough to stick a skewer through easily but still maintain it's structure.
Italian Meringue
3 egg whites
1 1/4 cups sugar
1/3 cup water
pinch cream of tartar
Bring water and sugar slowly to a boil with cream of tartar, and boil for about 4 minutes. The mixture and it's bubbles should be clear and shiny but not reduced down too much at all.
I never check my temperatures, I just go by the look- sorry.
Put the eggwhites into mixer bowl on low speed, then pour in syrup slowly.
Crank it up to full and beat until white, billowy and glossy clouds are created, and it's fairly cool.
For a better explanation,see my post on icecream cone cupcakes.
Now the fun part, pulling it all together.
The easiest way to do this at home is to serve it all cold, that way you can set the plates up well in advance and just sprinkle the crumbs on at the last minute. At a restaurant, I would serve the rhubarb and lemon curd warm, and blowtorch the meringue at the last minute so it's just warm too, but it will still taste awesome cold as well.
Step 1, the Jam.
It's easier if you warm the jam a little, or if it's really thick you could thin it just a touch with boiling water. You want to be able to eat the jam with the rest of the dish so it adds a nice tart note. You don't want it to be so set hard that you'd have to suck the edge of the plate as the only way to get a taste of it.
Using a nice thick paintbrush- not one from the shed that you painted the walls with I hope, paint a nice thick stripe across the plate or bowl.
Step 2, the Meringue
For the rimmed bowl, I used a palate knife to smear a thick layer of meringue around the rim. You could pipe it, or wipe it, or blob it instead if you like. For the plates I blobbed it on leaving room for the meringue as well. Use a kitchen blowtorch to brown the meringue nicely and set the top.
Step 3, the Lemon Curd
Blob or pipe the curd into rounds alongside the meringue on the plates. For the bowls I put a generous amount in the middle.
Step 4, the Rhubarb
Blot the rhubarb off on some kitchen paper so it doesn't bleed onto the plate, then stack them artistically on one side, or on top of the lemon curd.
Step 5, the Crumb
Grab a packet of pure butter gfree, lactose free shortbread. Roughly crumble them up in your fingers to make some yummy crumbs to represent the pastry of the pie. You don't want dust, just nice chunky crumbs to add texture to the dish. Either place a line of them across the edge of the plate or pile them on top of the lot in the bowl. Either way, do this at the last minute or they'll go yucky and soggy and lose all their effect.
Phew! It's actually a lot quicker to plate this up than to read about it! I know the plating in the photos is very clunky and not elegant, but my right arm is out of commission for now and I bet you'll make yours a lot prettier. I guess my left arm has a steep learning curve ahead of it. I hope you like my idea for the smash pie, I won't mind if you buy the ingredients instead, or just enjoy the rhubarb jam or lemon curd on toast for brekkie. I just know I sure had fun playing around with my new toy and checking out what it can do.
So, Dearest Readers, would you make the components for the Smash Pie, or buy them ready made?
August 8, 2011
Coconut and Lime Syrup Cake
Hands up who misses Real Cakes?
Anyone? I know I sure do. Buying one pre-made is always a bit hit and miss, the best answer is always to make your own if you have time, but it's always great if you find a gem of shop that sell the Real Deal.
Our fantastic farmers markets in Canberra have a great array of local produce and producers. I love to wander the stalls on a Saturday, picking a choosing from such bounty.
I always check out the cake stalls even though there's not usually anything for me there. I glean ideas, flavours and combinations and just inspiration from the people there making stuff they're proud of. Amore Cakes is one of these. They even have a few gluten free items for me to try and they taste great.
Amore Cakes has a bustling stand with a selection of cakes available by the slice. Now these are Real Cakes. The flavours are really there, the slices are really moist and they taste really good! Honest cakes, that contain butter and sugar and all the other 'bad' stuff.
I was really excited the other day to find out they had produced a small recipe book with some of the best loved cakes in it. I knew how good they were already, so just had to find a way to convert them to gluten and dairy InTolerant, and I was set. My friend Pony is a huge fan of the Coconut and Lime cake, and with a MasterChef Winner Dinner at her place, I volunteered to bring dessert.
I never, ever take along something I can't eat- what's the point? When I serve up a cake or other gluten-filled looking substance and people tell me how great it tastes, I smile and help myself to a serving too. When I explain there's no gluten or (usually) lactose involved the first instinct of most is to spit it out, but then they remember how yummy it is and just keep eating. Sometimes it even changes an attitude or too as well. See, changing the world, one gluten at a time.
Lime and Coconut Syrup Cake,
adapted from Sam Walkers Amore Secrets Cookbook
125 gr Butter
1 cup Castor Sugar
4 Eggs
2 cups Dessicated Coconut
1 cup GFree SR Flour
150 grms Sour Cream
1 large Kaffir Lime Leaf, chopped finely
1/2 cup Shredded Coconut
Lime Syrup
100 ml Lime Juice
100 gr castor sugar
1 finely shredded Kaffir Lime Leaf
Now this cake isn't lactose free today. I decided to make it with the same sour cream recommended so I could get a feel for the recipe before I switch it up a bit. I think I'd like to play up the coconut a bit more and use dense coconut cream next time.
Cream the butter and sugar together with the kaffir lime leaf, until light and fluffy.
Add in the eggs and sour cream and beat well.
Stir through the flour and coconut.
Put the mixture into a lined 20 cm pan. I used this one, as that's the only 'normal size' one I've got, the others are all huge catering sized, but this one turned out juuuust right.
Sprinkle the shredded coconut on top and press lightly onto the mixture.
Put in the oven at 150*C and think happy thoughts for 2 hours while the house fills with smells that will be the envy of all who pass by.
Pull out the oven and let it cool in the pan for 5 mins. Pour the lime syrup over the cake and let it cool completely in the pan.
The cake turned out beautifully- smooth, moist, rich and delicious with a nice dense crumb, especially good for a gluten free cake. Cooling it the tin helps keep it from drying out and if you wanted you could even cover it to cool it slower.
The next day the cake was even better with the flavour of the lime less 'raw'. Sam recomends not storing the cake in the fridge and it certainly tastes a lot nicer at room temperature too.
I really love this cake, like I said- it's Real. And Really Good too!
So Dear Readers, what type of cake do you like the most?
Subscribe to:
Posts (Atom)


